Don't worry, We do not spam! By clicking to subscribe, you agree to our privacy policy.
Mightymill – Build log #3 -professional diy CNC router
 BySpikee

The Mightymill is the name I gave my professional DIY cnc router build that I’m working on. It features IHSV57 servo motors, BT30 ATC CNC spindle, Durfill polymer concrete filling and more.
My build has finally begun and in this post I will take you on the building journey. Make sure you have read part 1 here and part 2 here .
Assembling the machine frame
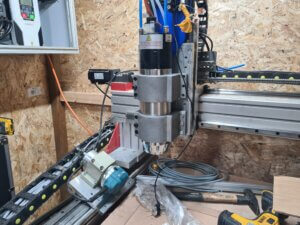
It took a while, but finally I was able to move the machine frame in my recently cleaned shed and get it assembled. For me, the concrete filled machine frame was one of the most time consuming aspects of this build.

The leg assembly was the most difficult to move. While I had put GD-60S wheels under it, it is till a top heavy assembly which weighs 120kg. With a bit of sweat and hurt, I was able to position it and get the assembly going.

I was able to assemble it without too much hassle. To get it all square I had to use the Farmer’s jack to pull the legs inward as there was a slight misalignment. After that it is square (diagonal measurement) within 1-2 mm over a span of 1.6 meters. Which is fine for this application.

It all seems to fit pretty well. Time to go on to the next step.
Lets “rise” up!
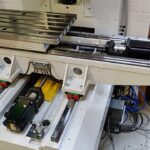
It was time to make the riser plates. I used my old and not so trusted HBM BF25 manual mill for this. It actually had lots of troubles during this process. Wobbliness … (DC) motor brushed dying, and other fun electronics issues… But i got it going again and was able to finish the job.


As you can see in the image, the side finish of my milling does not look very good. As I mentioned before my HBM bf25 is quite wobbly and not in a good state. There is still quite some play in the column and in the gibs even after tuning.
As the side surface is not a critical one for my application it is not too bad.

in a Dan Gilbart video I recently learned to make figure 8 motions when doing this. I tried it out and noticed it worked well. I did not actually check it on the surface plate but you notice that the surface is quite flat. Within >=0.0x mm I would estimate. Good enough for this part.
Whetstone set
This set of whetstones was affordable at 25$ and I was able to get it locally quickly.


It all fit well without too many issues. With such precision applications be sure to torque bolts and screws correctly. It is essential that you do in precision applications to ensure equal load and proper contact between surfaces.

After this I also ran the whetstones over it quickly to remove all the burrs.
In addition to this I had to buy the following items:
| Item | Link |
| BAP300R holder – BAP 300R 50-22-5T, APMT1135-H2 KT1505 | Aliexpress |
| MT3-FMB22(M12) (BAP300R holder) | Aliexpress |
| Cheap 3 axis DRO for mill / lathe | Aliexpress |

I used some 3mm thick ground steel parallels for equal spacing vs the alu block.

I used this method to ensure that the side of the extrusions meet the adapter plate perfectly at the same reference plane.


Finally! it is starting to look like a CNC!
Conclusion – Mightymill build Part #3
Moving and re-assembling the machine frame was one of my biggest hurdles. But once I got going it went relatively smooth. The Farmer Jack’s helped a lot with this.
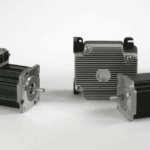
I ordered some new goodies such as Delta ASDA-M controller, 400W ECMA 20b optical encoder ac servo motors. A 1 meter 000 grade granite parallel (all surfaces) and some nice steel AC servo motor mounts. It is now all on the train from China. Hoping for it to arrive at the beginning of December.
The next step will be making the adapters for the ball screws and motors, mounting the extrusions to the table and making the z-axis adapter so it can all be mounted together.
Stay Tuned!
Make sure to subscribe to the newsletter to make sure you don’t miss any updates.
Feel free to reach out to me on discord