Don't worry, We do not spam! By clicking to subscribe, you agree to our privacy policy.
Mightymill – Build log #1 -professional diy CNC router
 BySpikee

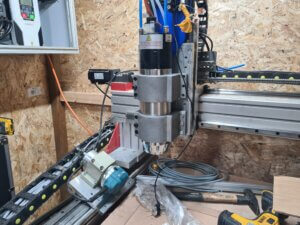
The Mightymill is the name I gave my professional DIY cnc router build that I’m working on. It features IHSV57 servo motors, BT30 ATC CNC spindle, Durfill polymer concrete filling and more.

My build has finally begun and in this post I will take you on the building journey.
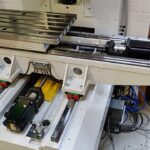
The machine frame
My machine frame is built out of 120x120x4mm thick steel tubing. I chose this size as I could get it relatively cheaply. It is massive overkill, however. As my shed only has a small door it needed to be able to come apart easily so I opted for various bolted connections instead of welding it fully (which would have been much and much easier).

I added some extra supports for the machine bed which is not shown in the image above.
For painting I opted for Nelfamar Vinyl Plus which as a marine grade vinyl paint. I used this is various outside based projects before and it is easy to use, durable and quite affordable. The color I opted for is RAL3002 “Kern red”.

Concrete time
I wanted to take advantage of the vibration dampening properties of filling the machine frame with polymer concrete such as UHPC or Durfill. I describe the workings of that in this post here.
As Durfill is relatively expensive when you use it in low quantities I opted for using off-the-shelf pre-mixed concrete from the local Hornbach which at 2.75 EUR per 25kg bag is a steal. I added Moertelshop’s Flup4 to it to enhance its properties.


To cover the bolts I added grease to them and tighten them to the steel base. After semi-drying the concrete they were removed. I still need to do one of the steel legs. When I have some time in the coming weeks I’ll proceed with it.
Aluminium extrusion
For the machine itself, I used 80x80mm aluminum extrusion for the Y axis and 120x120mm extrusion for the X axis. The gantry risers are also 120x120mm aluminum t-slot profile.


Again to enhance it’s stiffness and vibration dampening properties I have filled these with UHPC polymer concrete. The specific product I used is Durfill by Durcrete.
It performs better than regular concrete or run-of-the-mill UHPC. As the volume for these aluminum extrusions is limited I chose the more expensive but better-performing Durfill product.
Polymer concrete time – Durfill
Durfill expands a little to ensure a good hold on the containing material. To ensure a clean mounting surface a spacer was created to prevent it from expanding past the edge.

Afterwards the spacer can just be washed out by washing it out with water. This method is extremely simple but works well.
With the Durfill, I just followed the mixing instructions and poured it into the aluminum extrusion. Whatever was spilled on the side, just wash it off with the garden hose.

After drying, the washed out spacers of the riser tubes look like this:

I did some video recording during this process. I’ll be uploading that somewhere in the coming weeks on my youtube channel.
The gantry tubes etc have also dried at this point.The weight of the table frame is about 400kg after filling it with concrete and mounting it togther.
Mounting and adjusting the Linear guides
For my design I utilized Sorotec Blue‘s HGR20 rails with P – precision class and P1 preload.
One of the first things I had to do was to create an adapter in order to allow two HGW20CC carriages and my dial indicator to be mounted to it. With a hole in the middle to tighten the t-slot nut and bolt. If you are interested in the drawing of this just hit me up on Discord.

After finishing this on my HBM BF25 mill (glorified drill press) I mounted it on my Y axis rail.

| Product | Link |
| 0.01 mm resolution dial indicator | 20$ aliexpress |
| Magnetic dial indicator base stand | 15$ aliexpress |
Buy these t-slot nuts!
I used the regular “twist and turn” t-slot nuts before and they are… very bad for this application. After switching to the model on the right all my adjustment issues went away. I was able to align the whole rail in just a few minutes instead of an hour of tinkering. Do not cheap out on your (t-slot) nuts!

After using the premium of style of t-nuts the adjustment went swiftly.
Video of the linear alignment
I aligned the distance between the blocks to about 10um. This took about 15 minutes of work. Good enough for me 🙂
Conclusion – Mightymill build Part #1
I was able to make a good amount of progress so far. The next step is starting with the Z-axis and getting that going. Make sure to subscribe to the newsletter to make sure you don’t miss any updates.
Feel free to reach out to me on discord
Continue reading