Non preoccuparti, non facciamo spam! Cliccando per iscriverti, accetti il nostro politica sulla riservatezza.
Mightymill - Costruisci registro #3 -router CNC fai da te professionale
 DiSpikee

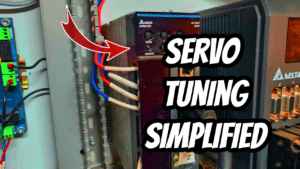
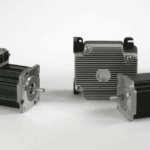
Il Mightymill è il nome che ho dato al mio router cnc professionale fai da te build su cui sto lavorando. È dotato di Servomotori IHSV57, Mandrino CNC BT30 ATC, Durfill riempimento in cemento polimerico e altro ancora.
La mia costruzione è finalmente iniziata e in questo post ti accompagnerò nel viaggio di costruzione. Assicurati di aver letto la parte 1 qui e parte 2 qui .
Montaggio del telaio della macchina
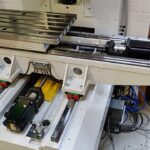
Ci è voluto un po', ma alla fine sono riuscito a spostare il telaio della macchina nel mio capannone pulito di recente e ad assemblarlo. Per me, il telaio della macchina pieno di cemento è stato uno degli aspetti che richiedeva più tempo di questa costruzione.

Il gruppo delle gambe era il più difficile da spostare. Mentre avevo messo le ruote GD-60S sotto di esso, è fino a un gruppo pesante superiore che pesa 120 kg. Con un po' di sudore e dolore, sono stato in grado di posizionarlo e far partire l'assemblea.

Sono riuscito a montarlo senza troppi problemi. Per sistemare tutto ho dovuto usare il martinetto del contadino per tirare le gambe verso l'interno poiché c'era un leggero disallineamento. Successivamente è quadrato (misura diagonale) entro 1-2 mm su una campata di 1,6 metri. Che va bene per questa applicazione.

Tutto sembra combaciare abbastanza bene. È ora di passare alla fase successiva.
"Alziamoci"!
Era giunto il momento di realizzare le piastre montanti. Per questo ho usato il mio vecchio e non così fidato mulino manuale HBM BF25. In realtà ha avuto molti problemi durante questo processo. Traballante ... (DC) motore spazzolato morente e altri divertenti problemi di elettronica ... Ma l'ho riacceso e sono riuscito a finire il lavoro.


Come puoi vedere nell'immagine, la finitura laterale della mia fresatura non ha un bell'aspetto. Come ho detto prima, il mio HBM bf25 è piuttosto traballante e non in buone condizioni. C'è ancora un po' di gioco nella colonna e nei lardoni anche dopo l'accordatura.
Poiché la superficie laterale non è critica per la mia applicazione, non è poi così male.

in un Dan Gilbart video Recentemente ho imparato a fare movimenti di figura 8 quando lo faccio. L'ho provato e ho notato che funzionava bene. In realtà non l'ho controllato sulla piastra di superficie ma noti che la superficie è piuttosto piatta. Entro >=0.0x mm stimerei. Abbastanza buono per questa parte.
Set di pietre per affilare
Questo set di pietre per affilare era conveniente a 25$ e sono stato in grado di ottenerlo localmente rapidamente.


Tutto è andato bene senza troppi problemi. Con tali applicazioni di precisione, assicurarsi di serrare correttamente bulloni e viti. È essenziale che tu faccia in applicazioni di precisione per garantire un carico uguale e un contatto adeguato tra le superfici.

Dopodiché ci ho anche passato sopra velocemente le pietre per affilare per togliere tutte le sbavature.
Oltre a questo ho dovuto acquistare i seguenti articoli:
| Elemento | Collegamento |
| Supporto BAP300R – BAP 300R 50-22-5T, APMT1135-H2 KT1505 | Aliexpress |
| MT3-FMB22(M12) (supporto BAP300R) | Aliexpress |
| DRO economico a 3 assi per fresatrice / tornio | Aliexpress |

Ho usato alcuni paralleli in acciaio rettificato di 3 mm di spessore per una spaziatura uguale rispetto al blocco di alluminio.

Ho usato questo metodo per garantire che il lato delle estrusioni incontri perfettamente la piastra dell'adattatore sullo stesso piano di riferimento.


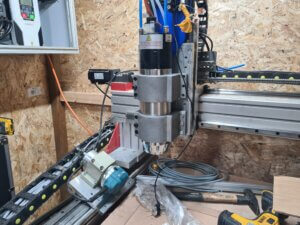
Finalmente! comincia a sembrare un CNC!
Conclusione – Mightymill build Parte #3
Spostare e rimontare il telaio della macchina è stato uno dei miei maggiori ostacoli. Ma una volta che ho iniziato, è andato relativamente liscio. Il contadino Jack mi ha aiutato molto in questo.
Ho ordinato alcune nuove chicche come il controller Delta ASDA-M, i servomotori AC con encoder ottico ECMA 20b da 400 W. Un parallelo di granito di grado 1 metro 000 (tutte le superfici) e alcuni bei supporti per servomotore AC in acciaio. Ora è tutto sul treno dalla Cina. Sperando che arrivi all'inizio di dicembre.
Il prossimo passo sarà realizzare gli adattatori per le viti a ricircolo di sfere e i motori, montare le estrusioni sul tavolo e realizzare l'adattatore dell'asse z in modo che possa essere montato tutto insieme.
Rimani sintonizzato!
Assicurati di iscriverti alla newsletter per non perdere nessun aggiornamento.
Sentiti libero di contattarmi su discord