Don't worry, We do not spam! By clicking to subscribe, you agree to our privacy policy.
Mightymill – Build log #2 -professional diy CNC router
 BySpikee

The Mightymill is the name I gave my professional DIY cnc router build that I’m working on. It features IHSV57 servo motors, BT30 ATC CNC spindle, Durfill polymer concrete filling and more.
My build has finally begun and in this post I will take you on the building journey. Make sure you have read part 1 here.
The heavy duty z-axis
Due to wanting to use a BT30 ATC spindle I had to upgrade to a heavy duty Z-axis. The design I opted for was originally designed by Crabs Shed. I optimized some small aspects of it and added it to my design.

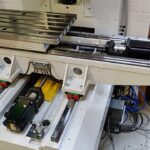
Milling the z-axis plates
Crabs Shed was so kind to help me with milling the z-axis plates for my diy cnc build.
He even made a video of him milling it:
Initial measurements

One of the first things I did after receiving the plates was mounting my Sorotec Blue line HGR20 rails to it and measuring the (relative) flatness of the base plate versus it.
I quickly noticed that the leftover milling marks had a significant impact on the relative flatness of the mounting surface.
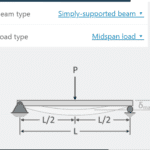
As the rails I uses are P – grade and my carriages have p1 preload it adds additional requirements on the rail mounting surfaces and alignment versus each other.

The image above gives you an indication regarding the accuracy of various parts of the rail and the various grades available. Regular Aliexpress “china” rails will be grade C or worse undefined.
I measured too much deviation of the z-axis mounting plate for my liking. I really wanted to keep this under 0.01mm or better hence I had to take it one step further.
Surface correction step #1
I got myself a set of whetstones from aliexpress in order to get rid of the milling marks and achier an overall surface which is more uniform.
In terms of improving the surface finish and flatness this did the most. It removed all the high spots and made the surface much more even.
Whetstone set
This set of whetstones was affordable at 25$ and I was able to get it locally quickly.


Surface correction step #2
I got myself a small and affordable granite surface plate. It came with a full test certificate and all.

I got this since i wanted to scrape the high spots of the mounting surfaces flat.
In addition to this I had to buy the following items:
| Item | Link |
| Gedore 133 F-200mm HSS scraper | https://amzn.to/3MtxuUp [USA] https://amzn.to/3CYbJcf [DE] |
| Diamant bluing paste – Tuschierpaste | https://amzn.to/3rXDr2y [DE] |
| Rubber brayer roller | https://amzn.to/3g1Obdj [USA] https://amzn.to/3MvDKe6 [DE] |
In total I spent about 2 hours of scraping. Can significantly speed it up if your initial plate is flatter or if you use power tools such as a dremel to do the difficult work for you.


I was not completely happy about the Diamant bluing paste. When indents get smaller than 0.01mm you will have a very hard time seeing it. There are better alternatives out there albeit those are difficult to get as an European.
When fully assembled, I measured the parallelity of the top plate vs the mounting surface of the Z-axis and it is well below 0.01mm. Good enough for me!
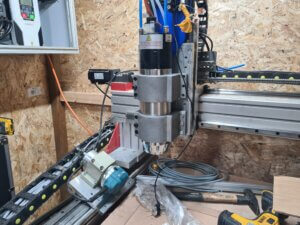
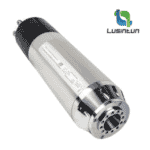
Mounting the Lusintun ATC spindle
Time to start drilling holes in the 100mm spindle mount.

The spindle mount was too tall so I could not fit a bigger size drill in my BF25L. So i had to put it on the side and ream it to the final size of 8.5mm.


How heavy is the Z-axis?

I would have guessed that it would have been heavier but 25.4kg it is!
New goodies
As I’m still waiting on quite a few milled parts for my cnc build I put my focus a bit on other aspects of the build.
HGR20 linear rails covers
To protect my nice precision and preloaded linear rails I know that I needed to get myself some linear rail protection. After looking on Aliexpress I found myself some.


I got 6 of the 600mm length ones. This is probably a bit too long for my build but I was afraid to get ones which were too short. It has many “internal supports”. This enables you to cut it to size when needed. You can find them here on Aliexpress.
Tool length measurement
In addition to that my tool length measurement sensor just came in. It seems like quite a solid and professional item. I also made a separate review of it. For those interested you can find it here.
Finishing up the machine frame
As I had too little concret last time, I went to Hornbach, got some more and finished up the second leg of the machine frame.

I cut some extra holes in the legs as I wanted to make sure it was completely filled.
After grinding it open I observed that it was completely filled. So there is no need for doing this. the total weight of a single concrete filled leg is 120kg now.
Mounting for the machine feet
I started cutting some 120x120mm squares out of 10mm thick steel plate to have a surface to mount my GD-60 levelling feet to.

After cutting and tapping it was time to grind off some paint from the legs and weld them to the frame. It made a little mess of my previously beautifully painted kern red paint.

I will have to clean up the spatter a bit and re-paint the damaged parts.

Conclusion – Mightymill build Part #2
Getting the z-axis mounting surfaces flat and dialed in was initially one of my bigger concerns. But after wet sanding it and scraping I was quite happy with the result.
Additionally I was able to make some progress regarding the machine frame.
Now it is finally ready to go to the next step and that is mounting and aligning the alu extrusions and rails to each other. And start making my design into reality.
Make sure to subscribe to the newsletter to make sure you don’t miss any updates.
Feel free to reach out to me on discord