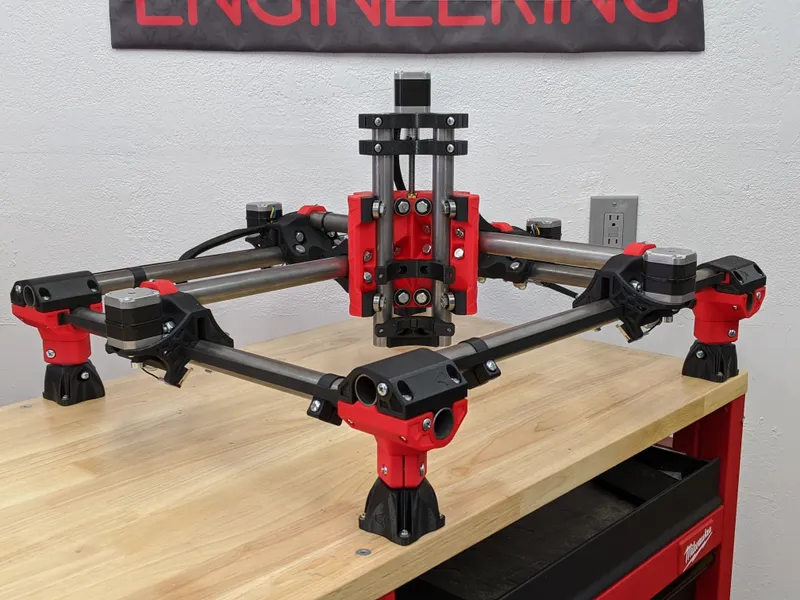
MPCNC Primo vs LowRider CNC 3 — V1 Engineering's Two Different Philosophies
V1 Engineering designed MPCNC Primo and LowRider 3 for different sizes of work. This comparison covers the older LowRider 3; new builders should also consult the current LowRider 4 documentation.
Table of Contents
- The Design Difference: Compact Frame vs Sheet Router
- Work Area & Material Volume
- Cost Comparison
- Rigidity & Precision
- Z-Axis & 3D Capability
- Setup & Workflow Difference
- Shared Ecosystem (This Matters)
- Material Capability
- When MPCNC Primo Wins
- When LowRider CNC 3 Wins
- The Decision Criteria
- Upgrade Path Reality
- Verdict
- Shop This Guide
- Related Articles
MPCNC Primo and LowRider 3 share the V1 Engineering ecosystem but suit different build sizes. LowRider 3 is now an older design; check LowRider 4 before ordering parts for a new build.
MPCNC Primo is a configurable, low-cost CNC for smaller work. Keep its working area and tool height only as large as your projects need.
LowRider is designed for large sheet work on a suitably sized table. The gantry can be removed for storage, but full-sheet cutting still needs full-sheet working space.
Both are V1 machines with overlapping controller and firmware options. Pick the design and dimensions around your actual parts, then use the configuration for that machine.
The Design Difference: Compact Frame vs Sheet Router
| Aspect | MPCNC | LowRider |
|---|---|---|
| Frame Position | Mounted on a table; work inside the frame | Travels on a table, guided by a side rail |
| Work Orientation | Horizontal (work on a table) | Horizontal, with work secured to a table |
| Work Area Definition | Limited by frame size | Defined by gantry width and table travel |
| Footprint Comparison | Small (24–48" square table) | Table and machine extend beyond the cutting area |
| Setup Process | Mount work on table inside frame | Secure the sheet to the table and home the machine |
| Movement Logic | Router moves X/Y over fixed work | Gantry travels along the table; router moves across the gantry |
| Z Clearance | Depends on leg height, tool mounting and spoilboard | LR3 documentation recommends an 80 mm Z geometry |
| 3D Capability | Capable, within the configured working envelope | Capable, within stock and tool clearance |
Both machines hold the work on a table. MPCNC surrounds a compact work area with its frame; LowRider moves a wide gantry along the table for larger sheets.
Work Area & Material Volume
This is the primary decision point.
MPCNC Primo:
- Work area: configurable; keep it compact for the parts you make
- For axes above roughly 1 m, V1 recommends considering LowRider
- Use case: brackets, small panels, precision parts, anything under 24"
LowRider CNC 3:
- Work area: up to 4×8 feet (1220×2440mm)
- Practical size: scales with your space
- Use case: full sheets, cabinet sides, large flat panels, signs
For full-sheet cutting, LowRider is the V1 design to consider. For smaller work, a compact MPCNC can be cheaper and easier to fit into the shop.
Cost Comparison
MPCNC Primo Complete Build:
- Frame kit (V1 Engineering): $200–250
- Extra conduit & hardware: $50–100
- Spindle (Makita RT0701C): $95–120
- Controller & PSU: $80–120
- Bits, misc: $30
- Total: $455–620 (typically ~$550)
LowRider CNC 3: illustrative budget for a 750 x 750 mm build
- Frame kit (V1 Engineering): $350–450
- Extra hardware: $50–100
- Spindle (Makita RT0701C): $95–120
- Controller & PSU: $80–120
- Bits, misc: $30
- Total: $605–820 (typically ~$700)
LowRider CNC 3: illustrative budget for a 1000 x 1000 mm build
- Frame kit: $400–500
- Hardware: $75–125
- Spindle: $95–120
- Controller & PSU: $80–120
- Bits, misc: $30
- Total: $680–895 (typically ~$800)
Cost difference: $100–300 depending on LowRider size. LowRider costs more, but you're getting dramatically more work area for the investment.
Cost per square inch of work area:
- MPCNC (600 x 600 mm): about 558 sq in; at the example $550 cost, about $0.99 per sq in
- LowRider (750 x 750 mm): about 872 sq in; at the example $700 cost, about $0.80 per sq in
- LowRider (1000 x 1000 mm): about 1550 sq in; at the example $800 cost, about $0.52 per sq in
In these illustrative budgets, the larger LowRider builds cost less per unit of cutting area; compare complete bills of materials before buying.
Rigidity & Precision
MPCNC uses printed parts and bearings on steel tube; LowRider 3 uses a braced tube gantry, table-running bearings and Z linear guides. Cutting results depend on build size and setup.
- Repeatability: measure it on the completed machine
- Dimensional accuracy: verify with test cuts and measurements
- Surface finish: clean on wood, good on acrylic
The designs support their moving parts differently. Compare the specific build dimensions, tool height and cutting load rather than assuming equal stiffness.
Longer unsupported spans can increase flex. LowRider is designed around sheet work, so span, gantry construction and tool height all matter when comparing builds.
Z-Axis & 3D Capability
Compare usable tool clearance and cutting depth on each build.
MPCNC:
- Z travel: build-dependent; keep the assembly as short as practical
- Z drive: a leadscrew in the documented standard build
- 3D carving: fully capable
LowRider:
- Z geometry: V1 recommends 80 mm for LR3, with about 1.5 inches of cutting depth
- Z rigidity: best with the gantry kept low
- 3D carving: possible within the available stock, tool and gantry clearance
LowRider 3 raises and lowers its gantry. V1 recommends keeping it low for rigidity and using an adjustable table for thick work instead of making a taller machine.
For deep 3D work, compare actual stock clearance and tool reach before choosing either machine.
Setup & Workflow Difference
MPCNC Setup:
- Mount work on a table inside the frame
- Set work home/zero
- Run job
LowRider Setup:
- Secure the sheet to a flat spoilboard on the machine table
- Place the gantry on its table tracks and guide rail
- Set corners or registration points
- Run job
LowRider makes large sheets accessible, while a compact MPCNC suits smaller stock. Both need secure workholding, a suitable spoilboard and correct work coordinates.
Material Capability
Both can route common sheet materials with suitable tooling and setup:
- Wood: excellent
- Acrylic: excellent
- MDF: excellent
- Plywood: good (tearout control needed)
- Aluminum: possible with suitable tooling, conservative engagement and a rigid setup
Material capability depends on machine stiffness, tool geometry, workholding, spindle speed and cutting parameters. The design matters as much as the settings.
When MPCNC Primo Wins
- Work area under 24×24" is sufficient: purpose-built, optimal cost
- Your 3D work fits a compact, low-height build : check actual stock and tool clearance
- Small-part accuracy matters : verify the completed build with measured test cuts
- Budget is under $600: MPCNC is cheaper
- Setup complexity bothers you: MPCNC is simpler (work clamped in frame)
- You're new to CNC and want to learn: smaller, less intimidating
When LowRider CNC 3 Wins
- You need to route full sheets or large panels: non-negotiable requirement
- Cabinet making or furniture is your primary work: purpose-built for this
- Work area requirements exceed 24×24": LowRider scales easily
- You can provide a suitably sized table : the gantry is removable for storage
- Large sheet capacity matters : you need room to nest and cut panels
- Cost per square inch is important: LowRider is dramatically cheaper at scale
The Decision Criteria
| Question | Answer → Choose |
|---|---|
| "Do I need to cut 4×8 sheets?" | Yes → LowRider; No → MPCNC |
| "Does my carving fit the machine's usable Z clearance?" | Check either build against stock height, tool reach and required cutting depth |
| "What's my largest single part?" | Larger parts favor LowRider; smaller parts can suit either design |
| "Do I have limited shop space?" | Compare complete table dimensions and storage arrangements for either design |
| "Will I cut furniture parts?" | Yes → LowRider; No → MPCNC |
| "Is budget my constraint?" | Yes (under $600) → MPCNC; No → Either |
| "Do I need a machine I'll outgrow quickly?" | Don't plan for growth → MPCNC; Plan for growth → LowRider |
Upgrade Path Reality
MPCNC:
- Ballscrew conversion would require custom design work
- Profile-rail conversion would require custom design work
- Larger spans reduce stiffness; V1 suggests LowRider for axes above roughly 1 m
- If you outgrow it, you build something else
LowRider:
- Ballscrew conversion would require custom design work
- Length can be increased with a longer table, guide rail and belts
- Choose dimensions with the version-specific calculator before buying parts
- A longer Y axis can be practical; widening the beam requires new geometry-dependent parts
Both designs are configurable. MPCNC favors compact spans; LowRider is the V1 route to full-sheet work.
Verdict
MPCNC Primo is the best small-format CNC for the price. If you're routing things under 24 inches and want to learn CNC affordably, it's unbeatable. The community is large, the docs are excellent, and it's simple enough to troubleshoot.
LowRider 3 is a documented older option for cabinet parts and sheet work. New builders should compare LowRider 4 and follow the parts list for the version they choose.
Choose around part size, stock height, table space and required finish. Verify accuracy on the finished build instead of assuming that LowRider cannot do precise or 3D work.
If your projects span small parts and full sheets, compare fixtures and workflow on one machine before committing space and money to two.
Shop This Guide
| Component | Source | Note |
|---|---|---|
| MPCNC Primo Kit | V1 Engineering → | Direct from designer; excellent source |
| LowRider CNC 3 Kit | V1 Engineering → | Same community, same support |
| Makita RT0701C | Amazon → | Standard spindle for both |
| GRBL Controller | Amazon: CNC Control Board → | Compatible with both machines |
| V-Wheel Bearings | Replacements if you wear wheels | |
| Ballscrew Upgrade | V1 Engineering or AliExpress | Optional, improves precision |
Parts for this guide
If you are buying after reading this, these are the specs to look for.
| Part | What to buy | Where to look |
|---|---|---|
| MPCNC motion belt A builder choosing Primo needs belt sized to the planned working area. | GT2, 2 mm pitch, 10 mm width, fiberglass reinforcement; buy the length from the Primo calculator. | |
| Primo drive pulleys A self-sourced Primo build needs pulleys that fit its motor shafts and belt width. | GT2, 16 teeth, 10 mm belt width, 5 mm bore; four for the documented Primo drive. | |
| Printed structural parts material A DIY builder needs enough suitable filament for the selected V1 machine. | PLA in the filament diameter used by your printer; follow the selected V1 version and part-specific infill settings. | |
| Compact router Either machine needs a cutting tool that fits its printed mount and the workshop supply. | Makita RT0701C, 120 V regional model, 1/4-inch supplied collet, with a matching V1 tool mount; use a locally rated equivalent on other mains supplies. |
"Search" buttons open a search for that exact spec, so compare listings against it before buying. Some links earn us a commission at no extra cost to you (disclosure).