LowRider CNC 3 Build Guide
The LowRider CNC 3 is a full-sheet (4×8) router that fits in a garage because the machine is the table. The router gantry rides on top of the work surface, not above it. This is brilliant because it means your machine can be bigger than your workshop.
Table of Contents
- Full-Sheet Cutting Without a Factory-Size Footprint
- Why LowRider Is Different: The Flat Gantry
- LowRider 3 vs LowRider 2: What Changed
- Real Work Area and Practical Limitations
- Who It's For (And Who It's Not)
- Key Specifications and Build Cost Breakdown
- Component Choices You'll Make
- Build Cost Reality
- Strengths: Why People Choose LowRider
- Weaknesses: The Trade-Offs
- The Gantry Sag Problem (And How to Fix It)
- Torsion Box Table Design (4×8 Reference)
- Assembly and Setup Workflow
- Real-World Community Experience
- Verdict: Build One If You Need Full-Sheet Capability
- Shop This Guide
- Related Guides
Slug: /guides/lowrider-cnc-3-guide/
Read time: 16 min
Full-Sheet Cutting Without a Factory-Size Footprint
The LowRider CNC 3 is a full-sheet (4×8) router that fits in a garage because the machine is the table. The router gantry rides on top of the work surface, not above it. This is brilliant because it means your machine can be bigger than your workshop.
Most routers require an elevated table (2–4 feet tall) large enough to accommodate the entire work area plus the machine frame. A 4×8 table with a traditional gantry router needs a 8×10 foot room minimum. A LowRider? Drop it on top of a 4×8 torsion box table, and the machine footprint is the table footprint.
This is the appeal: cabinet makers, sign shops, and hobbyists who need to cut full sheets of plywood use LowRiders. The community is active, documentation is excellent, and machines in the field have logged thousands of cutting hours.
Here's what you need to know to decide if it's right for you.
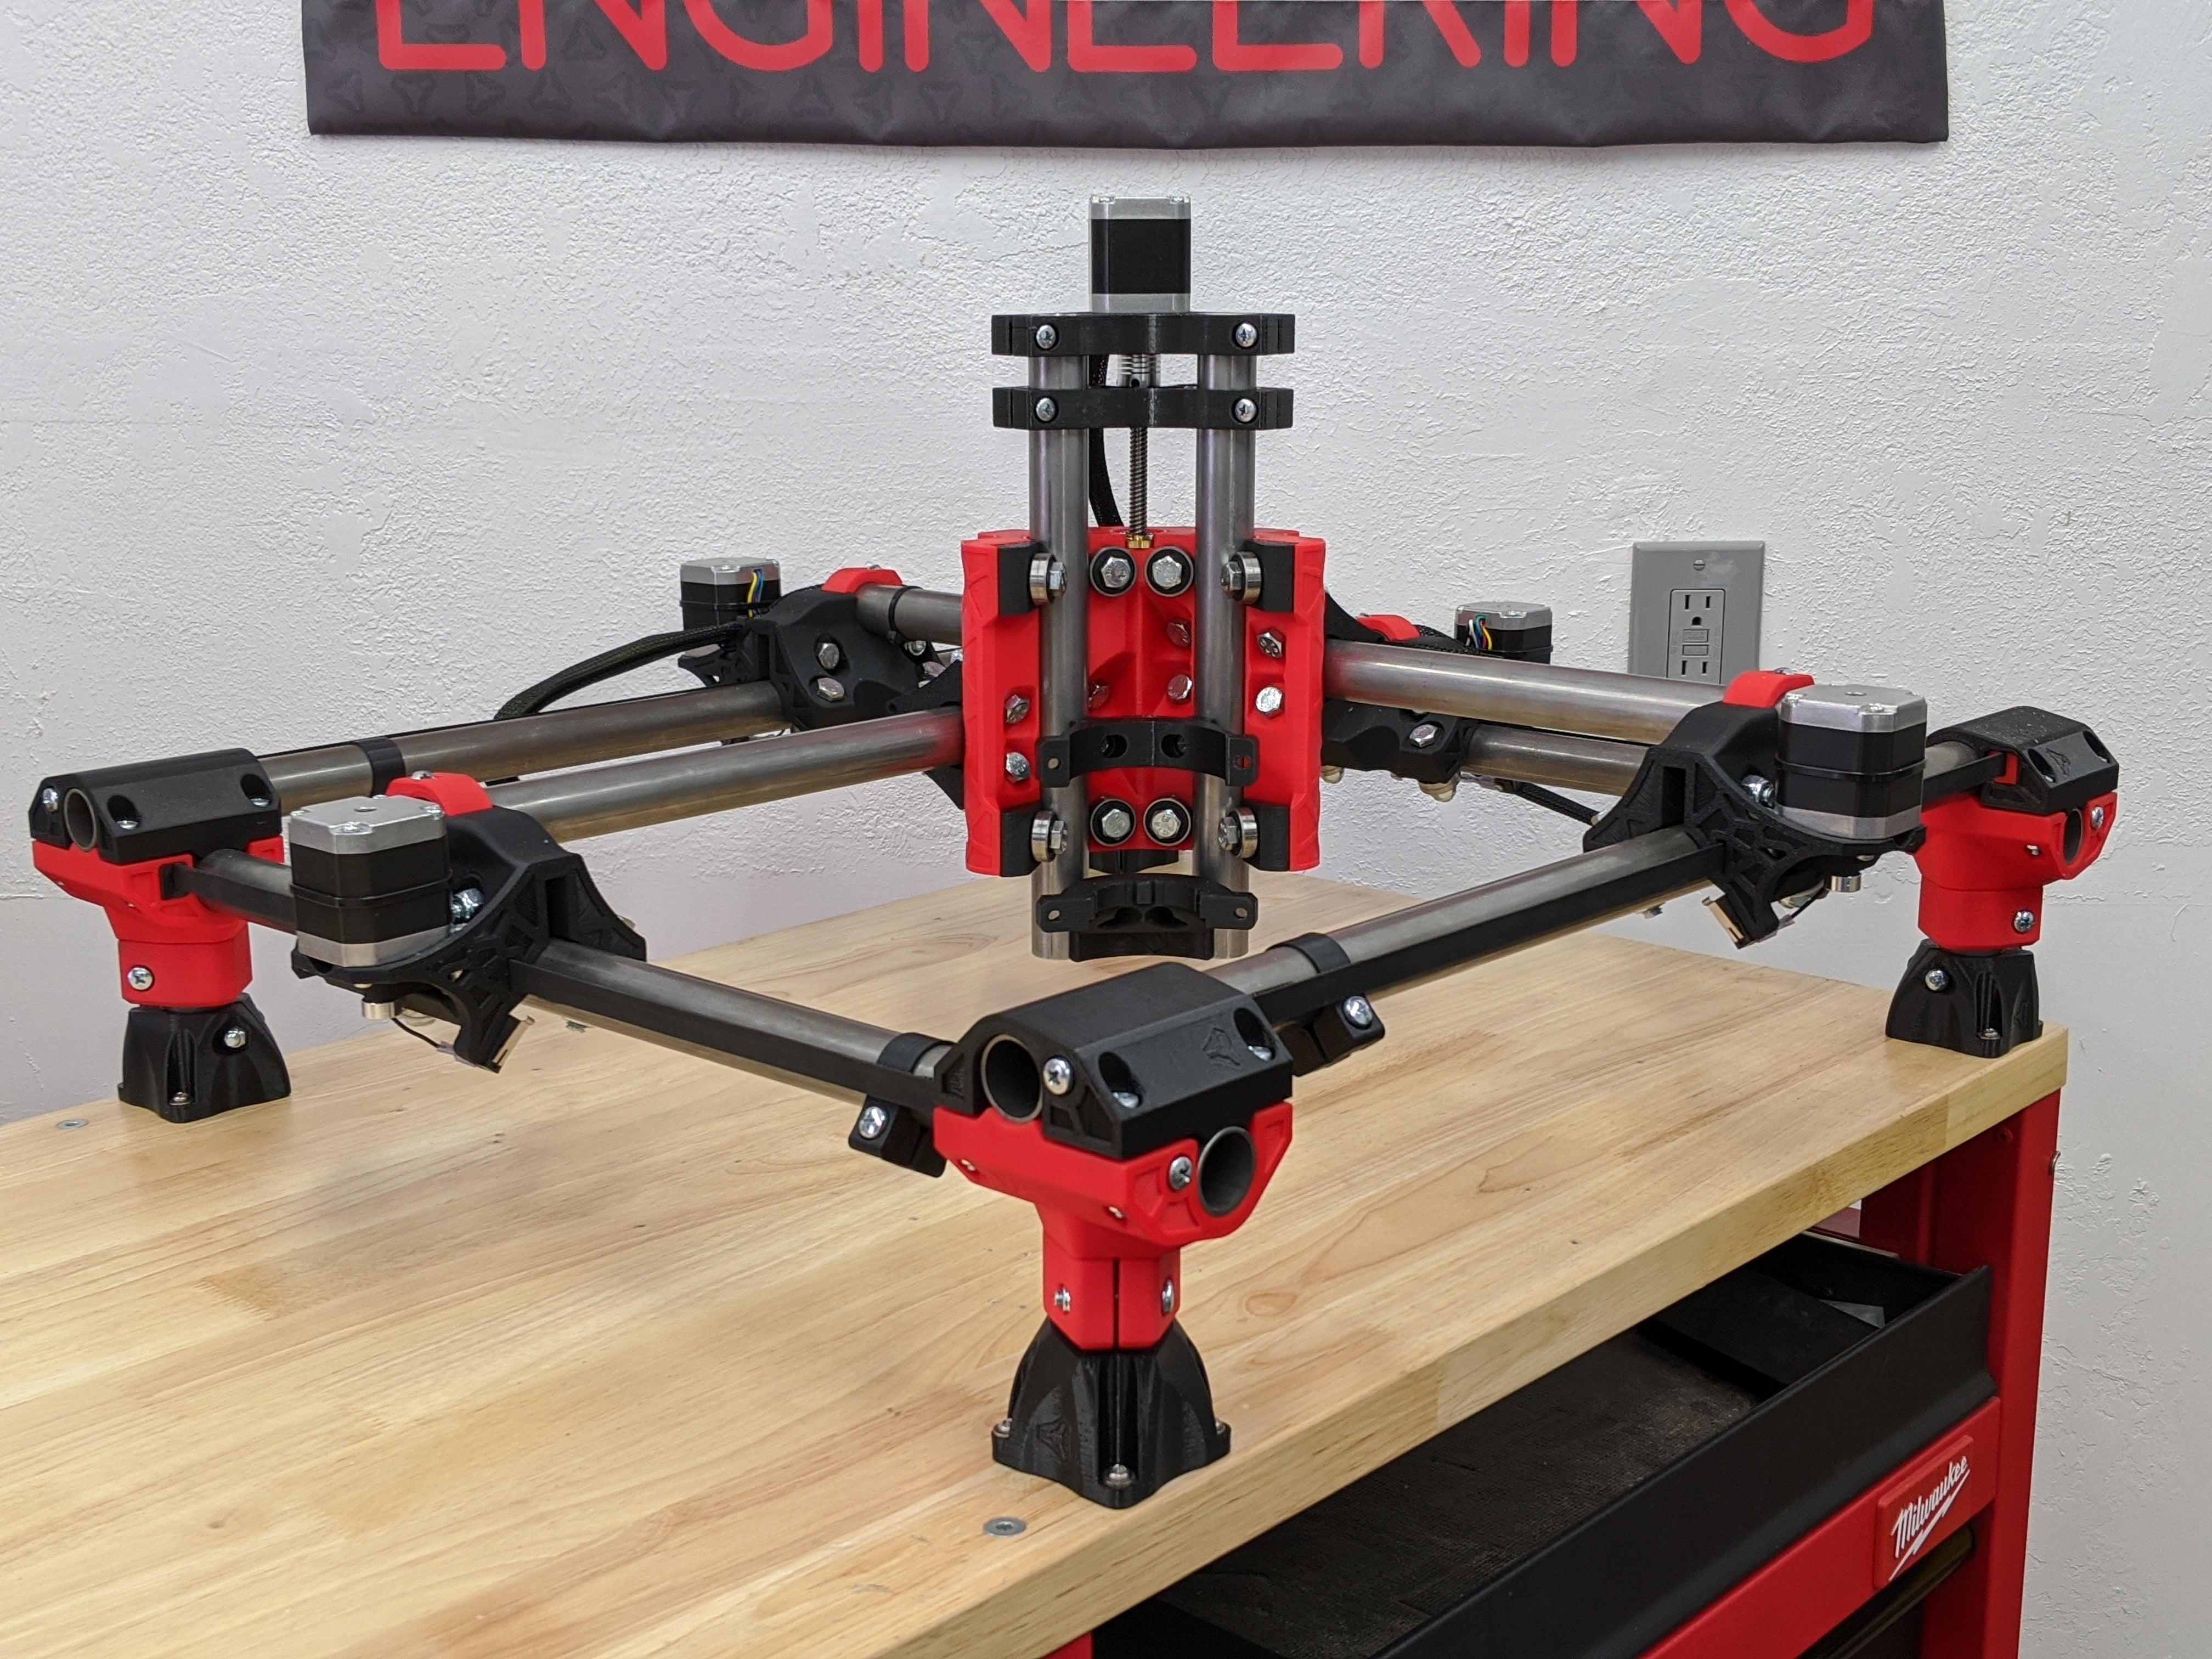
Why LowRider Is Different: The Flat Gantry
Traditional CNC routers have a raised gantry (the structure holding the spindle) that sits on top of a stationary table. The gantry moves X and Y, the table stays fixed. This requires the table to be larger than your work area.
LowRider flips this: The gantry is low, sitting just 80–100mm above the work surface. The gantry straddles the work like a bridge, with Y rails on either side. As the gantry moves forward and backward, the work stays stationary on a flat table.
Consequence: The machine's footprint equals the table's footprint. A 4×8 table supports a 4×8 work area (actually 4'×7'11" accounting for the gantry overhang, but effectively full-sheet).
What this enables: Full-sheet cutting of plywood, MDF, and engineered panels. Cabinet builders can cut their entire sheet of parts without repositioning.
LowRider 3 vs LowRider 2: What Changed
LR2 (previous generation):
- Separate YZ gantry plate bolted to the main Y structure
- More assembly steps
- Works, but more joints and complexity
LR3 (current generation, ~2021 onward):
- Consolidated YZ plate (one piece, not welded or bolted)
- Cleaner assembly
- Easier to square and adjust
- 3D-printed mounting bracket for the spindle
Practical difference: LR3 is simpler to build and align. If you're choosing between used machines, LR3 is the better choice, but LR2 machines are still excellent.
Real Work Area and Practical Limitations
Advertised work area: 4×8 feet
Actual usable area: ~4'×7'11"
Z clearance: ~80mm (the gantry height above the table)
The Z clearance is the limiting factor for tall work. You can't cut 3D terrain if the tallest point is more than 80mm high. But for 2.5D work (plywood routing, panel cutting, engraving), this is perfect.
The table: A properly built torsion box table (hollow core, very rigid, lightweight) is standard. V1 Engineering publishes plans for a 4×8 torsion box that weighs ~150 lbs (manageable for two people to move).
Who It's For (And Who It's Not)
LowRider is perfect for:
- Cabinet makers and furniture builders
- Sign shops and engraving
- Anyone needing to cut full sheets efficiently
- Hobbyists with large format projects
- Mobile setups (can be moved off the table)
LowRider is NOT ideal for:
- 3D carving (Z clearance is limited)
- Precision aluminum milling (gantry is less rigid than fixed-gantry designs)
- Tiny detail work (the machine is large; small work is hard to position precisely)
- Multi-tool production runs (slow tool changes without a fixed station)
Key Specifications and Build Cost Breakdown
| Spec | Value | Notes |
|---|---|---|
| Work Area | 4×8 ft (full sheet) | Actual: ~4'×7'11" |
| Z Clearance | 80mm | Limits to 2.5D work (mostly) |
| Y Rail Quantity | 2 (one on each side) | 25mm EMT pipe |
| Drive System | NEMA17 motors (5 total) | 2 Y, 2 Z, 1 X; integrated control |
| Z-Axis Structure | Printed parts + 25mm EMT | Modified nut traps for ballscrews (LR3) |
| Controller | SKR Pro, Jackpot, or Duet 3 | GRBL firmware |
| Spindle | Makita RT0701C typical | 1.25 HP router, excellent community support |
| Build Time | 80–120 hours | Varies with printing speed and experience |
| Build Cost | $400–600 | Excluding table (~$200 additional) |
Component Choices You'll Make
Linear Rails: MGN12 vs MGN15
Most LowRiders use MGN12 (linear motion rails) for X and Z axes. MGN15 exists but is overkill for the spindle forces a 1.25 HP router generates.
Cost: MGN12 sets: $150–200. MGN15: $250+.
Real-world: MGN12 is fine. The community consensus is "buy MGN12; it works."
Drive: Leadscrew vs Ballscrew
LR3 uses ballscrews (RM1605 standard) for Z-axis. Earlier versions used leadscrews. Ballscrews are faster, more repeatable, and only slightly more expensive.
Cost: Ballscrew sets: $40–70 per axis.
Motors: NEMA17 vs NEMA23
LowRider uses NEMA17 motors throughout. They're adequate for the work and the footprint is small.
NEMA23 upgrades exist but are overkill and heavier. Stick with NEMA17 unless you're planning extreme cutting forces (which LowRider isn't designed for).
Controller Options
GRBL-based (most common):
- SKR Pro 1.2: ~$60. Works, widely supported, abundant documentation.
- Jackpot: V1 Engineering's optimized board, ~$120. Slight performance edge, better support.
- FluidNC (open-source GRBL variant): Free firmware; runs on various boards.
Mach3 / Mach4 (less common):
- Windows-only software
- More powerful for multi-axis control but overkill for LowRider
- Steeper learning curve
Most beginner builders choose SKR Pro or Jackpot. The difference is minimal; community documentation favors both equally.
Spindle: Makita RT0701C
The community standard. Why?
- Cheap ($70–90)
- Reliable (300+ hobby machines use this spindle)
- Excellent dust shoe designs exist specifically for it
- Good speed control (10,000–30,000 RPM)
- Smaller than industrial spindles, fits the gantry
Alternatives:
- Dewalt DWP611 (same size, similar performance)
- 1.5 kW water-cooled spindle ($150–250, overkill for wood)
- Makita plunge router (bigger, overkill)
Recommendation: Makita RT0701C. Zero regrets, abundant support.
Build Cost Reality
Core machine (~$400–500):
- Printed parts (filament cost): $30–50
- Hardware kit (bolts, nuts, etc.): $50–100
- EMT conduit (Y rails): $40–60
- Linear motion parts (MGN rails, carriages): $150–200
- Motors + drivers: $80–120
- Controller (SKR Pro): $60–80
- Makita router: $70–90
Table (~$150–200):
- 2×4 lumber and plywood: $100–150
- Hardware: $30–50
Total: ~$550–700 for a complete machine ready to cut.
Compare to commercial machines:
- Shapeoko Pro: $2000+
- Haas TM-1: $30,000+
- Used Shopbot: $5000+
LowRider is the value play.
Strengths: Why People Choose LowRider
- Large format. Full-sheet cutting is transformative if you need it.
- Portable. Can be moved off the table and stored. (Try that with a Haas.)
- Cost. $600 complete machine vs $2000+ for commercial equivalents.
- Community. V1 Engineering forums are active, build logs abound, documentation is excellent.
- Proven. Thousands of machines in the field, logging real work hours.
- Modular. You can upgrade components (rails, motors, spindle) as you go.
Weaknesses: The Trade-Offs
- Z clearance. Limited to ~80mm. No tall 3D carving.
- Gantry rigidity. The long X beam can sag slightly on 4-foot-wide cuts (0.05–0.1mm). Not a show-stopper for wood, but noticeable.
- Sag mitigation: Some builders add a center-support rail or brace the gantry. Adds ~$100 and complexity.
- Spindle positioning. The spindle sits on the edge of the Z assembly; side-load forces are non-ideal. Fine for wood, not ideal for aggressive aluminum.
- Assembly time. 80–120 hours is not trivial. Print time alone is 40+ hours.
- Support. V1 Engineering doesn't provide traditional customer support; the community is your resource.
The Gantry Sag Problem (And How to Fix It)
On 4-foot spans, the X beam (the 25mm EMT tube that carries the spindle side-to-side) has a tendency to sag slightly in the middle under spindle load. This manifests as varying Z-depth across the full width of the table.
Mitigation:
- Cross-brace the gantry. Add a diagonal steel tube between the Y rails, perpendicular to the X beam. Drops sag from 0.1mm to <0.05mm.
- Use a stiffer X beam. Switch from 25mm EMT to 4080 aluminum extrusion. Overkill, but completely eliminates sag.
- Accept it and surface your wasteboard. A surfaced wasteboard compensates for minor Z variation. Most builders do this anyway.
Community consensus: Most builders accept minor sag and surface the wasteboard. It's the simplest solution.
Torsion Box Table Design (4×8 Reference)
A torsion box is a hollow structure (like a sandwich): two thin plywood skins with a grid of internal webbing. It's extremely rigid, lightweight, and flat.
DIY 4×8 torsion box (V1 design):
- 3/4" plywood top and bottom skins
- 1×4 lumber internal webbing (5×5" grid)
- Glued and screwed together
- Dimensions: 4'×8'×3" thick (or 4" for extra rigidity)
- Weight: ~120 lbs (manageable to move)
- Cost: ~$150–200 in materials
Benefits:
- Extremely flat (0.1mm variation over 4×8)
- Lightweight (can be moved)
- Absorbs vibration well
- Good for workholding (T-track or tape adhesion)
Community builds: Search "torsion box table" on V1 forums; dozens of builders have documented their construction.
Assembly and Setup Workflow
Rough build order:
- Assemble Y rails and motion system (48 hours)
- Assemble X beam and gantry (24 hours)
- Wire motors and controller (8 hours)
- Calibration and testing (8 hours)
Critical steps:
- Square the frame (use a 3-4-5 triangle or laser square)
- Tension the EMT Y rails (they flex; pre-tension removes slack)
- Calibrate stepper motor steps-per-mm (using a ruler and test move)
- Test probe cycle (Z-zero automation)
Documentation: V1 Engineering wiki and assembly videos are excellent. Follow them step-by-step; no surprises.
Real-World Community Experience
From V1 Engineering forums (paraphrased):
- "Took me 100 hours to build, totally worth it. Full-sheet cutting is amazing."
- "Sag is real, but surfacing the wasteboard fixes it. No complaints."
- "Makita router is perfect; quieter and more reliable than I expected."
- "Assembly was tedious but straightforward. No machining skills required."
- "Wish I'd built the torsion box stiffer; mine flexes slightly when clamping heavy."
Common first-time builder mistakes:
- Under-tensioning the Y rails (causes sag)
- Not surfacing the wasteboard (causes Z inconsistency)
- Skipping the calibration step (miscalibrated steps-per-mm)
- Using too small a table (4×8 is tight; any larger is overkill)
Verdict: Build One If You Need Full-Sheet Capability
If you need to cut plywood sheets regularly: LowRider is unbeatable. $600 machine, proven design, active community. Build one.
If you're curious but don't have large projects: Start with a smaller format (MPCNC, Shapeoko) first. LowRider is a big commitment.
If precision aluminum cutting is your goal: PrintNC is better suited (smaller, stiffer, but smaller format).
The reality: LowRider has logged thousands of cutting hours in the wild. It works. People who build them use them for production work. That's the strongest recommendation I can offer.
Shop This Guide
| Item | Price Estimate | Link |
|---|---|---|
| Hardware Kit (official, V1 shop) | $80–120 | V1 Engineering Official Shop (non-affiliate) |
| 3D Printed Parts (print service) | $50–100 | Printed Parts on PrintNinja → |
| SKR Pro Controller Board | $50–70 | SKR Pro 1.2 → |
| NEMA17 Motor Pack (5) | $35–60 | NEMA17 Stepper Motors → |
| Makita RT0701C Router | $70–95 | Makita RT0701C → |
| EMT Conduit & Fittings | $40–60 | EMT Tubing Kit → |
| Linear Rails & Carriages | $150–200 | MGN12 Rail Sets → |
| Ballscrew Set (RM1605) | $40–70 | Ballscrews → |
| Plywood & Lumber (table) | $100–150 | Local lumber supplier (buy locally) |