PrintNC Build Guide: Rigid Steel CNC Without Welding
PrintNC emerged around 2019 as an answer to a specific frustration shared by the CNC community: "How do we build something as rigid as a welded steel frame without needing welding skills?"
Table of Contents
- The Aluminum Extrusion Limit Was Real. Steel Tube Is the Answer.
- The Problem PrintNC Solves
- PrintNC's Community-Driven Story
- Why Steel Tube Changes Everything: Rigidity
- The 3D-Printed Joint Innovation
- PrintNC 105: The Standard Configuration
- Core Design: Steel Tube + 3D Joints + Ballscrews + Linear Rails
- Build Cost Breakdown (PrintNC 105)
- Component Choices and Optimization
- Assembly and Build Process
- Cutting Aluminum: The Payoff
- Weaknesses and Trade-Offs
- Real-World Community Feedback
- Verdict: Build One If You Want Aluminum Capability
- Shop This Guide
- Related Guides
Slug: /guides/printnc-guide/
Read time: 17 min
The Aluminum Extrusion Limit Was Real. Steel Tube Is the Answer.
PrintNC emerged around 2019 as an answer to a specific frustration shared by the CNC community: "How do we build something as rigid as a welded steel frame without needing welding skills?"
The solution is elegant: rectangular steel tube (40×80mm typical) connected with 3D-printed PETG corner blocks, bolted together. The steel handles bending loads; the 3D-printed joints handle the fastening. No welding. No stress-relieving. No fabrication equipment beyond a drill and a saw.
The result: A machine that can cut aluminum reliably. Not "aluminum if you're careful." Not "aluminum with light passes." Actual, productive aluminum milling.
I've spent time with both aluminum extrusion and PrintNC machines. The difference in rigidity is visceral—the PrintNC is 3–4× stiffer, and every cut reflects that. Less chatter, better finish, fewer tool breakages.
Here's what you need to know.
The Problem PrintNC Solves
Aluminum extrusion machines (under 1kg load):
- A 4080 beam over 400mm span deflects ~0.05mm under cutting force
- Good for wood, okay for aluminum finishing
- Requires careful speed/feed selection
- Chatter is common, especially on hard woods and soft metals
Welded steel machines:
- Same beam, same span, deflects <0.01mm
- Excellent aluminum work
- Requires welding skills or outsourcing
- Stress-relief is recommended for precision
- Heavy and hard to modify
PrintNC (bolted steel):
- Same deflection as welded (~0.01mm)
- Aluminum is reliable
- No welding needed
- Modular (can be reconfigured)
- 3D-printed joints are clever engineering, not a hack
PrintNC's Community-Driven Story
PrintNC has no single company or founder. The design emerged from shared CAD files and Discord discussions (~2019). The community continues to iterate on designs, publish improvements, and support new builders.
Key phases:
- 2019–2020: Initial designs appear, first 10–20 machines built
- 2021–2022: Community validation, design stabilization, Discord community growth
- 2023–2024: PrintNC variants (105, 500, 1200), widespread adoption
Documentation: GitHub repos + Discord (no official wiki). This means documentation is distributed, sometimes redundant, but comprehensive once you dig.
Support: The community answers questions. V1 Engineering is a reference point for similar community-driven projects; PrintNC follows the same model.
Why Steel Tube Changes Everything: Rigidity
Physics of bending resistance:
- Rigidity depends on material (Young's modulus) and geometry (second moment of area, I)
- Steel Young's modulus: ~210 GPa
- Aluminum Young's modulus: ~70 GPa
- Steel is 3× stiffer per unit volume
Geometric advantage:
- A 40×80mm steel tube has I ~211 cm⁴
- A 4080 aluminum extrusion has I ~21.3 cm⁴
- Steel tube is 10× stiffer due to larger I (wall thickness advantage)
Combined: Steel tube is 3× material + 10× geometry = roughly 30× stiffer per unit volume than aluminum extrusion.
In practice: A PrintNC 105 (400mm span) deflects <0.01mm under spindle load. An equivalent aluminum extrusion machine deflects 0.05–0.1mm. This tiny difference is why aluminum chatters and PrintNC doesn't.
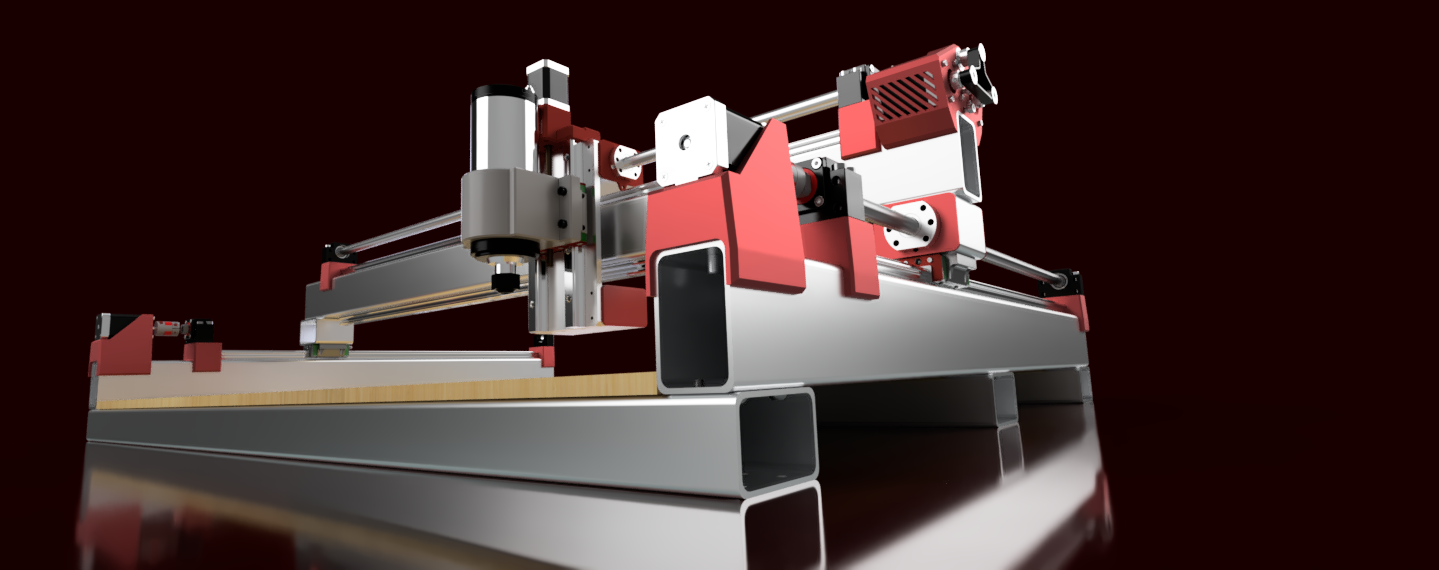
The 3D-Printed Joint Innovation
PrintNC's breakthrough is the 3D-printed corner block. Here's why it works:
Joint stress types:
- Shear stress (perpendicular force on the joint): PETG handles this fine (~60 MPa strength)
- Bending stress (moment forces on the joint): Steel tube handles this, not the plastic
Design principle: The steel tubes carry all bending loads. The plastic joints only handle shear from bolt preload. This is why PETG (inexpensive, strong enough in shear) works.
Criticism addressed: "Plastic joints can't handle it." Engineering analysis and thousands of machines in the field say otherwise. The plastic is not the weak point; the joints are well-designed.
PrintNC 105: The Standard Configuration
105 refers to the frame size (~105mm between Y-axis rails).
Work area: ~400×400mm (practical: ~390×390mm accounting for spindle overhang)
X-axis: Ballscrew + MGN12 rail
Y-axis: Two parallel rails, independent carriages (for rigidity and squareness)
Z-axis: Ballscrew with MGN12 rail
Why 105 is popular:
- Large enough for meaningful work (circuit boards, small parts, aluminum samples)
- Small enough to fit on a benchtop
- ~$1000–1500 build cost
- Excellent first CNC for someone stepping up from MPCNC
Variants:
- PrintNC 500: Larger format (~500mm work area)
- PrintNC 1200: Industrial-scale (requires larger table and more powerful spindle)
Core Design: Steel Tube + 3D Joints + Ballscrews + Linear Rails
Steel Tube Frame
Material: Rectangular steel tube, typically:
- 40×80mm (narrow depth gantry): 1.5–2mm wall thickness
- 50×100mm (larger variants): 2mm wall thickness
Where to source:
- Local steel supply shops (cheapest, can verify quality)
- Online suppliers (McMaster-Carr in the US; slightly pricier but convenient)
- eBay (used tube, risky but sometimes good deals)
Cost: ~$2–4 per kilogram; a complete frame (~30kg) costs $60–120.
Advantage over aluminum extrusion:
- Higher rigidity per dollar
- Stronger welds if you decide to reinforce later
- Proven in industrial CNC machines
3D-Printed Corner Blocks
Material: PETG (preferred) or nylon (more expensive, very durable)
Design: Blocks have pockets for the tube ends and bolt holes for fastening. Some designs have threaded inserts; others are designed for nuts and bolts.
Where to get:
- Print them yourself: If you have a printer, design files are open-source (GitHub, Printables)
- Print service: PrintNinja, Shapeways, or local makers (budget $100–150 for a full set)
- Community: Some builders offer printed kits on PrintNC Discord (check current availability)
Design choices:
- Some blocks are single-axis joints; others combine axes (fewer pieces, more complex printing)
- Material choice affects strength and cost (PETG < nylon < carbon-filled nylon)
Linear Motion: MGN12 or MGN15
MGN12 (standard):
- Lightweight, adequate for spindle loads
- Cost: ~$150–200 for a full set (X + Y + Z carriages)
- Preload: Light preload (C-grade) is fine; ultra-tight preload is unnecessary
MGN15 (stiffer):
- Used in heavier builds or when budget allows
- Cost: ~$250–350 for a full set
- Overkill for most PrintNC 105 builds
Community consensus: MGN12 is fine. Use MGN15 if you're doing aggressive aluminum cutting or building the larger 500 variant.
Ballscrews: RM1605 or RM2005
RM1605 (standard):
- 5mm pitch, 1605 diameter, standard preload
- Cost: $40–70 per axis (so 3 axes = $120–210 total)
- Perfectly adequate
RM2005 (stiffer, faster):
- 5mm pitch but larger diameter = stiffer
- Cost: $60–100 per axis
- Unnecessary for PrintNC unless you're going extreme
Bearings: BK12 and BF12 are the standard nut holders. Pre-assembled kits (screw + nut + bearings) cost $40–70 and are worth the convenience.
Controller: Mach3 vs GRBL
This is where the PrintNC community splits:
Mach3 / Mach4 (Windows-based):
- Prevalent in PrintNC builds
- More powerful multi-axis control
- Steeper learning curve
- Cost: $175 (Mach3, one-time license)
- Driver: UC300 (USB controller) ~$150–200
GRBL (open-source, Linux/Mac/Windows):
- Emerging in PrintNC community (FluidNC variant)
- Easier to learn (G-code is standard)
- Less expensive ($60 for controller board)
- Some advanced features require custom macros
- Cost: ~$80–100 total for board + drivers
My take: If you're already familiar with GRBL (from MPCNC, etc.), stick with GRBL. If you're new, GRBL is simpler. Mach3 is more powerful but steeper.
Spindle: 1.5 kW Water-Cooled Standard
Why water-cooled:
- Smaller form factor (fits tight Z-axis space)
- Better heat dissipation (aluminum cutting generates heat)
- Quieter than high-speed air-cooled spindles
- Standard in PrintNC community
Typical spec: 1.5 kW (2 HP), 24,000 RPM, with coolant pump and radiator
Cost: $150–250 for a kit (spindle + pump + radiator + VFD)
Alternative: 2.2 kW spindle (3 HP) for heavier cutting. Overkill for most hobbyists.
Why not a router (Makita)? Makita routers are designed for variable-speed wood work, not continuous coolant-fed aluminum milling. They can work, but water-cooled spindles are the community standard for a reason.
Build Cost Breakdown (PrintNC 105)
| Component | Cost Range | Notes |
|---|---|---|
| Steel tube frame (cut locally) | $60–120 | 30kg of steel, DIY cutting |
| 3D printed blocks | $80–150 | Print service (PETG) |
| Ballscrews + bearings (3 sets) | $120–210 | Pre-assembled kits preferred |
| Linear rails + carriages | $150–200 | MGN12, full set |
| Stepper motors (3) + drivers | $80–120 | NEMA23 2Nm + DM542T drivers |
| Controller (GRBL or Mach3) | $60–200 | GRBL = $60; Mach3+UC300 = $200 |
| Spindle kit (water-cooled) | $150–250 | 1.5 kW typical |
| Fasteners, hoses, wiring | $50–100 | Misc hardware |
| Table/enclosure | $100–200 | MDF base, optional |
| Total | $850–1,500 | Depending on component choices |
Comparison:
- Shapeoko Pro: $2,000+
- Haas Mini Mill: $15,000+
- Used Sherline: $800–2,000
- PrintNC 105: $1,000–1,200 (mid-range)
Component Choices and Optimization
Spindle Power vs Cutting Loads
1.5 kW is the community standard for good reason:
- Sufficient for aluminum up to 2mm depth at respectable feeds
- Not so large that cooling is a burden
- VFD allows variable speed (5,000–24,000 RPM)
2.2 kW (3 HP) if:
- You plan aggressive steel milling
- You have good cooling water supply
Do NOT use a Makita (as mentioned) unless you love noise and thermal issues.
Rail Orientation and Rigidity
Some builders use:
- Single-rail Y-axis (cheaper, less rigid)
- Dual-rail Y-axis (standard, excellent rigidity and squareness)
Recommendation: Dual rail. The cost difference is minimal (~$50), and squareness is critical for repeatability.
Ballscrew Grade and Preload
Grade C (standard preload): Fine for hobby use. Acceptable backlash (0.05–0.1mm).
Grade B (higher preload): Tighter backlash (0.02–0.05mm). Slight increase in friction and heat. Not necessary unless you're doing precision work (under 0.01mm tolerance).
Grade A (ultra-tight): Overkill and expensive. Skip it.
Assembly and Build Process
Typical build timeline:
- Frame assembly: 8–10 hours (cutting, drilling, bolting)
- Motion system assembly: 12–16 hours (rails, ballscrews, carriages)
- Electrical: 6–8 hours (motors, drivers, spindle VFD, wiring)
- Controller setup and calibration: 4–6 hours (GRBL flashing, steps-per-mm tuning)
- Total: ~40–50 hours hands-on work
Critical steps:
- Square the frame: Use a precision square or laser square to ensure X and Y rails are perpendicular. This is non-negotiable.
- Ballscrew preload: Tighten the nut end bearings to manufacturer specs. Under-tightening causes backlash; over-tightening causes friction and heat.
- Rail alignment: Z-rails must be parallel to X motion. X-rails must be parallel to Y motion. Use dial indicators to verify (<0.1mm tolerance).
- Spindle runout: Check spindle TIR (total indicated runout) with a dial indicator. <0.05mm is acceptable.
Documentation: GitHub repos (search "PrintNC 105 build guide") have detailed step-by-step photos. Follow them religiously.
Cutting Aluminum: The Payoff
Once your PrintNC is running, aluminum cutting is achievable and repeatable.
Typical aluminum pass:
- Material: 6061-T6 aluminum, 3mm thick
- Cutter: 3mm 2-flute end mill, carbide
- Speed: 24,000 RPM (spindle max)
- Feed: 300 mm/min
- Depth per pass: 1–1.5mm
- Result: Clean, chatter-free cuts
Why this works: The rigidity of the steel frame and the isolation of the spindle in the Z-axis allow aggressive feeds without chatter. Try this on an aluminum extrusion machine and you'll get vibration and tool breakage.
Cost per tool: Carbide end mills are $5–15 each. You'll wear them out slower on PrintNC (less stress = longer life).
Weaknesses and Trade-Offs
- Smaller work area. PrintNC 105 is 400×400mm. If you need larger, you're looking at PrintNC 500+ (more cost, more complexity).
- Spindle position. The spindle sits at the end of the Z-axis, creating a moment arm. Heavy side-load forces can deflect. Not an issue for typical aluminum cuts, but vertical loads are better.
- Build complexity. More steps than MPCNC or LowRider. Requires bolt-tightening discipline and checking for square/parallel alignment.
- Community support. No single company owns PrintNC. Support comes from Discord and GitHub. If you need hand-holding, Shapeoko or Tormach might be better.
- Cooling and debris. Water-cooled spindles require drainage and hose management. Aluminum swarf is abrasive and needs frequent evacuation.
Real-World Community Feedback
From PrintNC Discord (paraphrased):
- "Built mine in 3 weekends. Took longer than expected, but result is solid."
- "Aluminum cuts perfectly. No chatter at all. Worth every hour."
- "Dual-rail Y-axis was the right call. Machine feels rock-solid."
- "Mach3 learning curve was steep, but now I control every detail."
- "3D-printed joints are solid. Zero failures despite aggressive cutting."
- "First time aligning ballscrews; took patience, but final backlash is <0.05mm."
Common first-build mistakes:
- Over-tightening bolts (cracked printed parts)
- Under-squaring the frame (cumulative X/Y error over 400mm span)
- Ignoring spindle runout (chatter blamed on other sources)
- Skipping ballscrew preload verification (excess backlash)
Verdict: Build One If You Want Aluminum Capability
PrintNC is for:
- Hobby machinists stepping up from woodworking routers
- Anyone who needs to cut aluminum reliably
- Builders comfortable with mechanical assembly and tuning
- People who have 40–50 hours to invest
PrintNC is NOT for:
- First-time CNC builders (start with MPCNC or Shapeoko)
- People who need hand-holding support
- Shops requiring immediate production
- Anyone uncomfortable with metric tools and specifications
The reality: PrintNC is a serious machine. Thousands of hours of community testing have validated the design. People cut production parts on them. If you're skilled enough to troubleshoot assembly and willing to invest time, you'll own a machine that outperforms machines costing 3–5× more.
Shop This Guide
| Item | Price Estimate | Link |
|---|---|---|
| Steel Tube (40×80mm, cut kit) | $80–150 | Local steel supplier (buy locally) |
| 3D-Printed Block Set (PETG) | $100–180 | Print Service (PrintNinja) → |
| Ballscrew Kit (RM1605, 3-axis) | $120–210 | Ballscrews → |
| MGN12 Linear Rail Set | $150–220 | Linear Rails → |
| NEMA23 2Nm Motors (3) | $60–100 | NEMA23 Steppers → |
| DM542T Stepper Drivers (3) | $30–50 | DM542T Drivers → |
| Water-Cooled Spindle Kit 1.5kW | $150–280 | Spindle Kit → |
| GRBL Controller (SKR Pro) | $50–80 | SKR Pro Board → |
| Mach3 + UC300 (alternative) | $200–250 | UC300 Controller → |
| Fasteners & Hardware Kit | $50–100 | Metric Bolt Assortment → |